Today Our infographic post feature “What’s New in Photoshop CS6 – Infographics” recently and we tried the new Adobe Photoshop CS6 [Beta-version], we must say the new UI design is Dark as expected and might give some gliches to the users who worked photoshop for years and for large monitors it will sure affect.
But These are still beta version and sure they will improve the new features.
Photoshop CS6 Tutorial
Today we bring you the first PhotoshopCs6 tutorial for readers.
Create your first Photoshop CS6 tutorial you need a Beta version which is free for a limited time until there official release. You Download the Adobe Photoshop Cs6 version [BETA] from here.
Steps for installing Your Adobe Photoshop CS6 version here:
Note: Run your Setup as “Administrator” for best option. And restart your Workstation for everything setup and you need a Internet connection. Avoid any 3rd party application running to prevent any installing error.
BackLight Poster Design Effect Step 1
Open your Photography which you love to make a “blacklist” poster design effect. We are going to use premium content, but you can use any photos of yours. Do not use any copyrighted Photography.
BackLight Poster Design Effect – Step 2
Duplicate your Photography by Keyword “Ctrl+J” or Use the layer palette and right-click then select Duplicate layer. Give a new name to the new layer which you are going to make a duplicate.
Always use different name for best results, while using large layer files – it will be easy for the designers to distinguish between each layer and his/her creativity will flow to complete the current project.
BackLight Poster Design Effect – Step 3
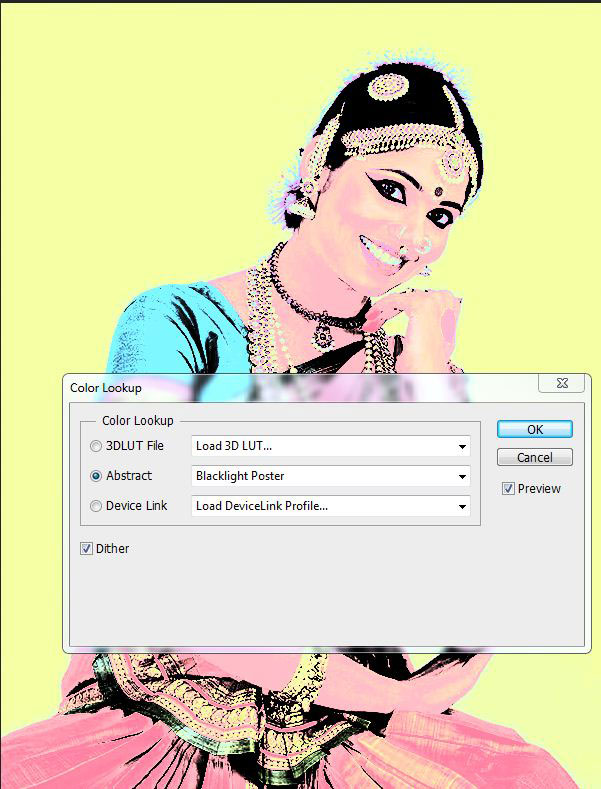
Now Go to Image MENU and select the adjustments from the sub menu and another submenu shows the lots of Tool options, while placing your mouse pointer and Select the “Color LookUp” menu and click it.
Choose the Second Check-box called “Abstract” and from the Drop-down menu select the “Back light poster”.
Now this is default Poster Effect from the adobe Photoshop team. Before getting into conclusion first try with different tones of photography and types of photography like lomography.
Like to Play more with photo effect?
BackLight Poster Design Effect – Step 4
Now decrease the “backlight effect layer opacity and fill value to 62% and 72% respectively. And you got a new effects and remember it will be unique to every photo you are going to try it. So try the effect and post in the comment section.
BackLight Poster Design Effect – Step 5
Now duplicate the “Backlight layer” with default value and change the layer mode to “Liner burn” with Opacity and Fill Value same as above.
Now here is the part which will excite you so much. As we said earlier, play with the awesome Layer mode and change the value, if you need you can change the Contour value.
optional step
Now you can add a black border or frame from the stocks you like it. Did you know we have a list of 180+ Resource stock image sites?
In our Next tutorial we will give you more basic effects we can create from Adobe Photoshop CS6 version. And this is another reason you can upgrade to your Photoshop CS5.
We just now tried the Photoshop CS6, we will give you more insight of the new Photoshop CS6 Beta version in our upcoming post. So stay tuned.


That’s so cool and easy steps you shared! i will surely try this tutorial! Thanks for sharing.
Hard to believe CS6 is already coming out.. I remember working in CS2 back in the day. Hell even Adobe Photoshop 7 before the creative suite existed.
hm. its a pity you didnt show the windows with functions. I have psp in other language version and having problems to find this back light. the explenation is hard to understand so I could find it by myself.
Anyway a great effect and feel really upset because cant get this !!!